Beginner's Tutorial
- Install the D compiler
- Install Goldie and SemiTwist D Tools
- Write a Grammar
- Compile and Test the Grammar
- Enhancing the Grammar
- Making a Real Program
- Suggested Exercises
- Additional Tools
All the code samples in this tutorial can be found in Goldie's tutorial subdirectory. To use them, simply follow along with this tutorial.
1. Install the D compiler
If you don't already have DMD installed, you can do it like this (where {NAME-OF-DVM-FILE} is the appropriate file for your OS from the DVM download page):
Windows:
Posix:
Note that DMD 2.057 won't work for this tutorial due to DMD Issue #7375.
(For more information on this step, see the DVM installation instructions.)
2. Install Goldie and SemiTwist D Tools
Download and extract the prepackaged release (in 7z format) for your OS. Or grab the "source-only" package. (If you'd prefer to download via Git, please see Download / Install.)
Then, just update your PATH to include the Goldie and SemiTwistDTools bin directories (or just symlink the executables to your preferred bin directory if you're on a Posix OS), and update DMD's configuration to include the Goldie and SemiTwistDTools src directories.
If you downloaded the "source-only" package, or downloaded via Git, you'll need to compile Goldie and SemiTwist D Tools like this:
(For more information on this step, see Download / Install.)
3. Write a Grammar
There are grammars already available, but to help get a feel for Goldie, let's write our own. For your first grammar, we'll keep it super-simple and make it a comma-separated list of integers. Goldie's grammars are written in the GOLD Meta-Language, so that's what we'll be using.
Start by opening your favorite text editor. Or you can use GOLD Parser Builder or Grammar Edit, both of which feature syntax highlighting and other benefits. There's also a syntax file for VIM.
Create a new file in your editor of choice and name it commas.grm. Enter the following into it:
tutorial/section3/commas.grm:
There's two things to notice about this code right from the start:
- Comments start with ! and extend to the end of the line. The grammar description language also supports multi-line block comments which look like this: !* comment *!
- Whitespace and indentation are not significant, but newlines are. However, that said, we could have put the | Integer at the end of the previous line and it would have still worked fine.
The first line, of course, is just a comment.
The next four lines just set some metadata for the grammar: Name, Author, Version, and About. You should normally include them, but they don't have any real effect.
The sixth line tells Goldie that the grammar we're describing is case-sensitive. Since our grammar is just numbers and commas, that's irrelevant, so just ignore it for now.
Terminal Symbols
Skipping the "Start Symbol" for a minute, let's look at the line defining our terminal:
A terminal symbol is the most basic part of a grammar. They're defined just simply with regular expressions. Our grammar is made up of integers, and we can easily describe an integer with a regular expression, so that's what we've done here.
To analyze that line more closely: First, we're naming our integer symbol (sensibly enough) Integer. Next, we're defining an Integer symbol to be an optional minus sign followed by one or more digits. The ? means "optional", the + means "one or more", and {Digit} is a built-in character set that means "any of the digits from 0 through 9". Instead of using {Digit}, we could also have been more explicit and said [0123456789] instead.
NonTerminal Symbols
Now we come to the nonterminal section. A nonterminal is any symbol in our grammar that's made of of other terminal and/or nonterminal symbols. Here's ours:
In the GOLD Meta-Language, the names of nonterminals are surrounded by angle brackets, such as <List> above. Goldie considers the brackets to be part of the symbol's name.
What the above code says, is that a <List> symbol can be (the correct term is "derives from") either of the following:
- Integer: Just a plain old Integer by itself.
- <List> ',' Integer: Any existing <List>, followed by a comma, and then an Integer.
Actually, the rule as written above is really just syntactic sugar for what are really two separate rules:
The combined form is preferred, though.
So this grammar accepts an integer as a <List>. But, since an Integer can become (or rather, the proper term is "reduces to") a <List>, the grammar also accepts an integer followed by a comma and then another integer. And since that reduces to a <List> too, our grammar also accepts that list of two integers followed by another comma and integer, etc..., all the way up to any number of comma separated integers you can throw at it.
So if you give it a list of numbers, the parser will march right through them like this (the parts that get reduced to a new <List> at each step have been highlighted):
By the end, the parser will have built this tree, from bottom to top:
Notice that the terminals are always the leaves of the tree. (That's why they're called "terminals".)
Getting back to the "Start Symbol" we skipped before:
That's a required part of every grammar. That tells the parser that the entire source being parsed must ultimately reduce to that one lone nonterminal. If it does, then the source is ok - it parsed successfully. If not, then it's not a valid source - the source has an error.
Those people experienced with LL parsers may have noticed that this is a left-recursive grammar and cringed. Such a grammar is not allowed in LL parsing, you'd have to write it using right-recursion: Integer ',' <List>. Goldie, however, is an LR parser (more specifically, an LALR(1)). In LR parsing, left-recursion is not only allowed, but is more efficient than right-recursion. Of course, that doesn't mean LR is necessarily better: We have our own issues to deal with, such as shift-reduce and reduce-reduce conflicts.
The Other Terminal
As it turns out, Integer isn't the only terminal in this grammar. There's also the comma. Since the comma is just a simple ordinary string and doesn't require any of the fancy regular expression features (such as the "optional" ?, the "one or more" + or the {Digit}), we were able to define it implicitly just by sticking it right in the nonterminal's definition. The name of this terminal symbol is just simply ,.
If we wanted, we could have defined it formally:
But putting it inline is more convenient and easier to read.
4. Compile and Test the Grammar
So far, we haven't actually used the grammar. We've just written it and discussed how it will work. So let's try it out for real (I believe the proper term is "fo realz", but I'm not hip enough).
Compiling the Grammar
First we have to compile our grammar. You can do this in GOLD Parser Builder, but Goldie has its own tool, GRMC: Grammar Compiler, so let's try that. At the command line:
That will compile the grammar and save it to the file commas.cgt. The extension "cgt" stands for "Compiled Grammar Table".
Testing the Grammar
Now that our grammar is compiled, we can test it. Create a new file named test.commas. In it, type the number list we used in the previous section:
Now save, and then go back to the command line to parse it against your freshly compiled grammar:
As you can see, there were no errors, and results were saved to the JSON files test.commas.tk.json and test.commas.pt.json. The first one is the result of the lexing phase, and the second is the final parsed result. Let's take a look...
Bundled with Goldie is a specially-modified version of a GUI program called JsonViewer. The original version, and thus this one as well, was written in C#, and unfortunately it does have some bugs when run in Linux under Mono (A rewrite in D is planned). But it works fine under .NET on Windows, and it does at least work somewhat on Linux/Mono, so let's give it a go.
Run the main JsonViewer executable: {main Goldie directory}/JsonViewer/JsonView.exe. Open the first JSON file with it: test.commas.tk.json. Then expand the tree on the left and you should see something like this:
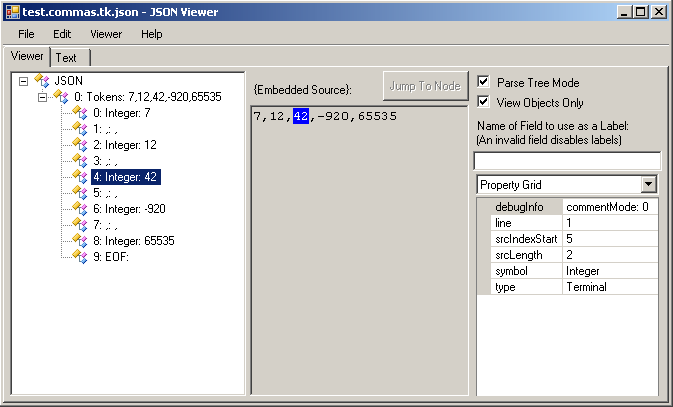
That's a lot of info! You can see that Goldie's lexer separated the list into a series of integer and comma tokens. Click a token in left panel, and it will highlight the token in the original source. Click a position in the source, then "Jump To Node", and it will highlight the corresponding token on the left. Whenever a token on the left is selected, the far-right-side panel will show various information about it.
But there's no structure! It's just a series of tokens. And there's no <List>. It only has the nonterminals. That's because this is only the output of the lexing phase. It's the parser that handles the nonterminals.
So let's open the other JSON file: test.commas.pt.json. Expand the tree on the left again:
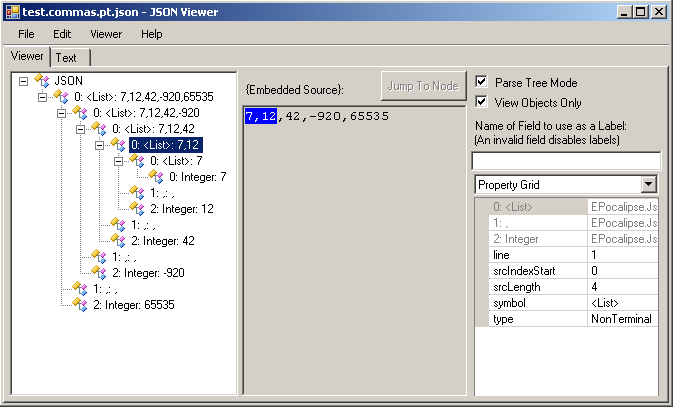
Now that's much more interesting. Although it's laid out differently, notice that the tree exactly matches what we predicted in the previous section: The same tree, built from the structure defined in the grammar file. The root node is a <List>, because that's what our "Start Symbol" was set to. That root node represents the entire source code, and consists of three subtokens: A <List> (representing the entire list except for the last element), then a , and finally an Integer (which represents the last element). Just like our definition of <List> ::= <List> ',' Integer!
At this point, I invite you to play around with the test.commas file, changing it, reparsing it, and seeing what happens. Make sure to try deliberately bad input: put words in, two commas in a row, decimals, etc. The parser will properly report the filename, location and what went wrong.
If you do something that's valid in the lexing phase (syntactically correct), but invalid in the parsing phase (grammatically incorrect), such as two commas in a row, the lexer's JSON output (*.tk.json) will look fine, but it won't be able to produce a parse tree (*.pt.json).
If you have a syntax error, such as including a word instead of an integer, then it will still save the lexer results and you'll be able to see the error token that was reported to you in the error message.
Whitespace and Comments
While playing around with the sample input, you may have noticed that the parser happily accepts any whitespace you throw at it: Spaces, tabs, newlines, etc. It even shows up in the lexer's JSON file. But we never defined any whitespace in the grammar!
The GOLD Meta-Language automatically defines a default whitespace terminal if you don't. You can override it like this:
That defines the whitespace to be one or more characters that can each be either space or (horizontal) tab. No newlines, no form-feed, no non-breaking space, no vertical tab (yes, there is such a thing!), no anything else.
Or, you can effectively disable whitespace by setting it to the rarely-used value of 1 (that is, the ASCII/Unicode code #1, not the actual digit '1'):
However you choose to define the whitespace, any whitespace tokens the lexer finds are automatically skipped by the parser.
The GOLD Meta-Language also has built-in support for comments, which work much like whitespace. For example, to define C/C++-style line comments and block comments:
Like whitespace, comments are detected by the lexer and then the parser skips them automatically. But unlike whitespace, there are no default comments. If you don't define a line comment or a block comment, then you don't get any line comments or block comments.
GOLD Parser Builder has rather advanced comment support as of version 5, but unfortunately Goldie doesn't support any of GOLD's new v5 features just yet. It will, but at the moment, Goldie is limited to one type of line comment, and one non-nesting block comment defined by a starting token and an ending token.
5. Enhancing the Grammar
Before getting into writing some real code, let's make a few small enhancements to our grammar.
"Zero" And Case Sensitivity
First, just for kicks, let's allow the text {zero} (including the curly braces) to be a synonym for 0. It'll still be considered an integer, just an alternate way of writing one, so we'll just add it into the Integer definition:
The | means "or". So this new version of Integer can be either {zero} or exactly what we had before.
Recompile the grammar, and now the you can use {zero} in your test.commas file!
This is where the "Case Sensitive" starts to make sense. Since we set it to true, the grammar will only accept {zero} exactly as we typed it in the source. It won't accept {ZERO}, {Zero}, {zERo}, etc. If you would like it to accept any casing, just change "Case Sensitive" to false. (If you omit the "Case Sensitive" line, it defaults to false.)
Identifiers
Let's update the grammar to allow some arbitrary identifiers, just like variable names in other languages. Typically, identifiers are defined to be a letter or underscore followed by zero or more letters, digits or underscores. So let's follow suit:
The {Letter} means "any upper or lowercase letter". The {AlphaNumeric} is the same, but it also includes 0 through 9. Finally, the * means "zero or more". So this quite literally means "A letter or underscore; followed by zero or more letters, digits or underscores".
That's getting a little long and harder to read, but we can simplify it by defining our own character sets:
That's surprisingly straightforward. When defining a character set (the names of character sets are always surrounded by curly braces), the + means "everything in both of these character sets". So {Ident Start} is the set off all letters plus the underscore.
We can also use - to exclude characters. For example, {AlphaNumeric} - {Digit} - [zZ] - 'A' results in all letters except for uppercase A, and upper and lowercase Z. Of course, if you set "Case Sensitive" to false, then it'll simply mean "All letters except for A and Z, regardless of case."
But now that we've defined our identifiers, we still have to work them into the rest of the grammar. I've highlighted the parts which have changed:
Now, instead of being a list of Integer, it's a list of <List Element>. And a <List Element> can be either an Integer or an Ident.
We're Surrounded!
We'll make one last little change: Our grammar should support two different forms: Large and Small. Large can accept any integer. But since supporting any integer can be computationally demanding, we have the option of a Small. The Small size means all values must fit into two bytes. In other words, only integers from 0 through 65,535 will be allowed.
Additionally, let's include the (somewhat contrived) expectation that the description of "Large" or "Small" must be repeated at the end of the source. For example:
First, we'll create a symbol for these size descriptions:
Now, we'll create another new symbol to combine it all together:
Since this new <Everything> is intended to represent the entire source (instead of <List> as before) we have to update the "Start Symbol":
And while we're at it, we may as well update the grammar's metadata. So now, our entire grammar looks like this:
tutorial/sections5-6/commas.grm:
Whew! That's a lot of changes!
You may notice that a couple of our new restrictions are not yet enforced: A "Small" list still accepts any integer, and the sizes at the beginning and end don't have to match: One could be "Large", but the other could still be "Small". Those are not things that are easily handled in a grammar. They're more of a semantic matter (rather than syntactic), so we'll handle them in our own code later.
In any case, compile this new grammar, and try it out!
6. Making a Real Program
Alright, now it's time for some real code:
Importing the Language
There are two main ways to load your grammar into GoldieLib:
One way is to load the compiled grammar file at runtime, just like the Parse tool did when we used it earlier. We could easily do that, but unless you're writing a program like Parse which needs to work on any grammar, it's better to take the other approach:
Use Goldie's StaticLang tool to convert your compiled grammar into a D package. Not only does this help your program startup faster and allow you to distribute your program without the compiled grammar file, but it also gives you the option of using GoldieLib's static-style interfaces. The nice thing about GoldieLib's static-style interfaces (as opposed to the dynamic-style ones) is they provide better compile-time safety. For example, if you mistype the name of a symbol (such as Idint instead of Ident), the static-style will give you an error at compile-time instead of leaving you with a runtime bug.
Creating a D package for your grammar is a simple as this:
That will create a package named commas. In your D code, import it like this:
Parsing the Input
Now we're ready to actually start using GoldieLib.
The first thing to do is load a file and parse it according to our commas grammar:
tutorial/sections5-6/program1.d:
The try/catch block is simply there so upon any parsing (or lexing) error you'll get a prettier error message than just an ugly unhandled exception.
The only particularly interesting line is this one:
That one line does it all. Let's break it down:
The language_commas is our commas language. It's a variable of type Language_commas and, like it's type, is automatically defined and instantiated in the commas package that StaticLang generated for us.
The language has a parseFile function which takes the name of a file (we're giving it args[1]), loads the file, and parses it according to our grammar. It throws a ParseException upon any errors in the file.
The parseFile function returns a Parser_commas, ie., the parser it used to parse the file. Various information can be obtained from the parser, but in most cases, the only interesting member is parseTree.
This parseTree is, naturally, the resulting parse tree. It is, in fact, the very same parse tree generated by the Parse tool we used earlier.
Finally, we stick the resulting parse tree into a variable named, unsurprisingly, parseTree. The type of this variable is Token_commas!"<Everything>". That makes sense, because <Everything> is the name of our grammar's Start Symbol. So naturally, the root of the parse tree would be an <Everything> token.
There is a relationship between the token types: Token_commas!"<Everything>" is a subclass of Token_commas which is a subclass of Token.
Create a commas file to test this program with (named, for example, test.commas). Then compile and run the program like this (If you're using DMD 2.055, add -ofprogram1 to the command below, before the program1.d):
You'll notice that any parsing or lexing errors will result in the exact same error messages produced by the Parse tool used earlier.
The Abstract Syntax Tree
It's time to actually do something with the parse tree. We'll start by pulling the data from a commas file into this structure:
That's essentially an Abstract Syntax Tree (AST) for our grammar. It matches up to the data contained in a commas file quite nicely:
The Commas struct represents an entire commas data file. It contains the size declared in the file (Large or Small) and an array of Element.
These Element structs, in turn, represent each of the individual values contained in the commas data file. For the values that are identifiers, it has a string ident to hold the identifier's name. For the integer values, the ident string will be null, and the integer value will be stored in the (appropriately-named) integer variable.
Regarding the integers: Since the Large-sized files can accept integers of any size, an ordinary 32-bit int won't cut it. Even a 64-bit long could fail for very large numbers. Since our spec said any size, we need to use a BigInt.
Navigating the Parse Tree
We have our parse tree, thanks to Goldie. And we've defined what we want to ultimately end up with. Time to connect those up by writing the core of our little program.
While writing this, it will help to have a sample parse tree to look at. So we'll use our old friends Parse and JsonViewer:
Then open test.commas.pt.json in JsonViewer:
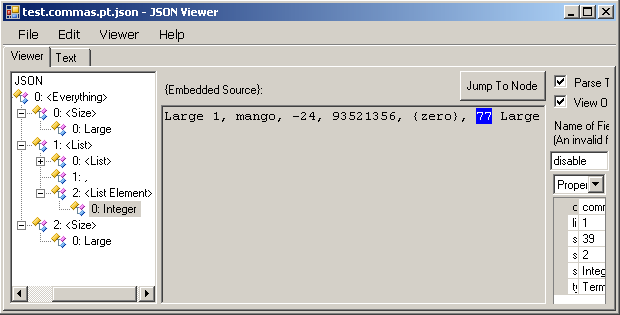
You'll also want to keep the grammar definition, commas.grm, open for reference.
To start, let's create a convenience alias to shorten the token types:
After parsing, we'll call a function (which we're going to write) to convert the parse tree to a Commas struct:
Here's the definition of toCommas:
First, this function determines the size that was chosen. Looking at the grammar definition (and confirmed by our sample parse tree), an <Everything> token has three subtokens: <Size>, <List> and then another <Size>.
We could access each of these subtokens with root.sub!0, root.sub!1 and root.sub!2 respectively (or in dynamic-style: root[0], root[1] and root[2]). But that's not very self-documenting, plus it's brittle if the grammar changes. So instead, we're using get to ask for the first immediate subtoken that's of type Tok!"<Size>".
Since Tok!"<Size>" is a nonterminal, the type Tok!"<Size>" is actually an abstract base class. The real type of tokSize depends on which of the rules was used to create it (ie, which "production rule" it's "derived from"):
To check if the Tok!"<Size>" comes from a Large, we simply try to downcast to the type for that rule:
If it isn't a Large, then the downcast fails, resulting in null, and the else branch is taken. Either way, commas.size is set appropriately.
Finally, the function grabs <Everything>'s <List> subtoken, and converts it to Element[] using our next function:
This function uses GoldieLib's traverse to search the parse tree from tokList downward. This is a standard "preorder" traversal: At each node in the tree, it visits the node itself first, then each of its entire child trees from left to right. Every time a Tok!"Ident" or Tok!"Integer" is found, our function converts it to an Element then appends it to an array.
One word of caution: You should be very careful about using traverse. Since it visits every subnode in the tree until you break out, careless use of it can cause big slowdowns in your program. If there are large sections of the parse tree you're not interested in, it may be much faster to use get and sub instead. Or you can use the skip() and predicate features of traverse to prune entire sections out of your traversal. In our particular case, most of the Tok!"<List>" parse tree is relevant, so we should be ok.
There's one nifty little D trick in this function I'd like to point out:
What the heck? A variable declaration inside an if's conditional?
Yup. D intentionally allows this. If the downcast fails (resulting in null), then tokElem is initialized to null, and you have if(null). That's false, so it takes the else, and tokElem is left completely undeclared. On the other hand, if the downcast succeeds, the conditional is true and tokElem can be used inside the if's "true" path.
On a related note, if you're wondering why the body code is identical for both if's:
That's because toElement is overloaded on tokElem's type, and tokElem is declared as a different type in each case: Tok!"Ident" in the first, and Tok!"Integer" in the second.
We're down to the two final functions:
These convert an Ident or Integer to an Element.
The first is straightforward: It just creates an Element and sets the ident member to whatever string was written in the original source file.
The second overload is slightly more complex, but not terribly so: As with the first overload, it takes the original string text from the source file. But instead of stuffing it straight into an Element, it checks for that alternative form of zero. Either way, a new BigInt is initialized with the appropriate string and set as the integer member of a new Element. The ident member is initialized to null since it's not applicable.
Finally, we need some output so we know things actually went right:
That requires a toString for Commas:
And one for Element:
That should about do it. Here's our program so far:
tutorial/sections5-6/program2.d:
Compile and run it with a sample commas file, and you'll see something like:
Semantic Errors
Remember the two restrictions our grammar didn't enforce? To recap: The sizes given at the start and end must match, and "Small" mode doesn't accept integers outside the range of 0 - 65,535 (ie, two bytes).
Well, our program still isn't enforcing those. It happily processes them and spits out bogus data. Try it and see:
tutorial/sections5-6/test-different-sizes.commas:
tutorial/sections5-6/test-out-of-range.commas:
Time to rectify that. Matching the sizes is easiest, so let's get that out of the way first. In the toCommas function, we'll adjust the size-handling portion like this:
We need to get both of root's two <Size> subtokens, not just the first. So we use the optional parameter of get to ask for the first and second <Size> tokens. Then, it's just a simple matter of ensuring the single subtoken of each <Size> are of the same symbol: Either Ident or Integer.
Now for enforcing Small. First of all, there's no need to use a BigInt when the number will fit into a two byte ushort. Element should support optional ushort, so we'll add two members:
And adjust the toString accordingly:
We should give ourselves an easy way to create an Element that uses smallInteger:
Now to actually create a such an Element when possible:
That's everything needed to use a ushort instead of BigInt when possible. All that's left is to require it when Small is used:
And there we have it: A full program for our grammar, and both semantic restrictions are enforced. Here's the final source for our program:
tutorial/sections5-6/program3.d:
To compile and use, just like before:
This section has only touched on some of the features of GoldieLib's API. For example, there are many other members of a token we didn't cover; see the API Reference for Token for a full list and descriptions. And browse through the rest of GoldieLib's Overview and Reference for much more information. Also, read through the sources for the GoldieLib Sample Apps.
7. Suggested Exercises
Here are some exercise ideas for practicing Goldie yourself:
-
Add a new size "Medium" for 32-byte signed integers (ie, D's int).
-
Make an alternate program for the commas grammar that finds the longest/shortest identifier, and the largest/smallest integer without creating an AST. Or create a sorted list of identifiers without creating an AST.
-
Modify the commas program to not use any form of get or traverse at all. Just use sub. Remember, you must downcast a token to its rule form (such as Tok!("<Size>", "Large") or Tok!("<List>", "<List>", ",", "<List Element>")) before you can use sub on it. (This is because which subtokens are available depends on the rule used to create the token.)
-
Convert a commas file to XML or JSON.
-
Add an additional "definitions" section to the beginning of the commas file that allows you to set values for each of the identifiers.
For example:
banana = 0; mango = 70; peach = 17; Large 1, mango, peach, -24, banana, 77 LargeWhen you output an identifier, also show its associated value, if available.
As a next step, require that all identifiers used must have an integer value defined.
-
Create a simple programming language like this:
output "Pick a number 1-10"; :start; input num; if num == 5 then goto done; if num > 5 then goto tooBig; output "Too small"; goto start; :tooBig; output "Too big"; goto start; :done; output "Yep!";Look at the included lang/dlex.grm file to see how to create a string literal.
Write an interpreter to run the code. Or write a translator program to convert the code to D. Later, add support for arithmetic expressions.
8. Additional Tools
We've covered most of the basics, but there are a few more tools we haven't discussed which could be helpful.
Dumping the Compiled Grammar Tables
First of all, there's DumpCGT. This is just what it sounds: it takes the data in a compiled grammar file and dumps it to a human-readable form:
That saves the data in our compiled grammar file to a readable text file named commas.cgt.txt. Open it up and you'll see our original metadata, and all the internal tables that drive the lexer and parser. You can also get the same information by loading the compiled grammar file into GOLD Parser Builder.
Some information that's not relevant to the lexer or parser is lost when compiling the grammar, so you can actually get a larger, better set of information by loading the original grammar into GOLD Parser Builder.
Lexer Graph
Goldie's lexer uses a finite state machine to convert source code into terminal tokens. GRMC: Grammar Compiler has a feature which allows you to use Graphviz to visualize how your grammar is lexed. This can be helpful for debugging a grammar or for just understanding how lexing works.
First, you'll need to install Graphviz. Then, use the --dot switch when compiling your grammar to save the lexer's finite state machine to the Graphviz DOT format:
That will create two files in addition to the usual compiled grammar file: commas.cgt.nfa.dot and commas.cgt.dfa.dot. These files each contain a graph of the grammar's finite state machine. It's the same graph, but in NFA and DFA forms, respectively. The NFA more closely matches the definition in your grammar file. The DFA is the graph Goldie actually uses and is created from the NFA.
The Graphviz interface is admittedly a bit...weird. But it's not difficult to learn. To view a DOT file:
- Run Graphviz's "dotty" program. It will start to a blank white window.
- Right-click inside the window, and choose "load graph" from the popup menu.
- Select the DOT file to load.
Here's what the graphs look like for commas.grm (click to enlarge):
NFA:
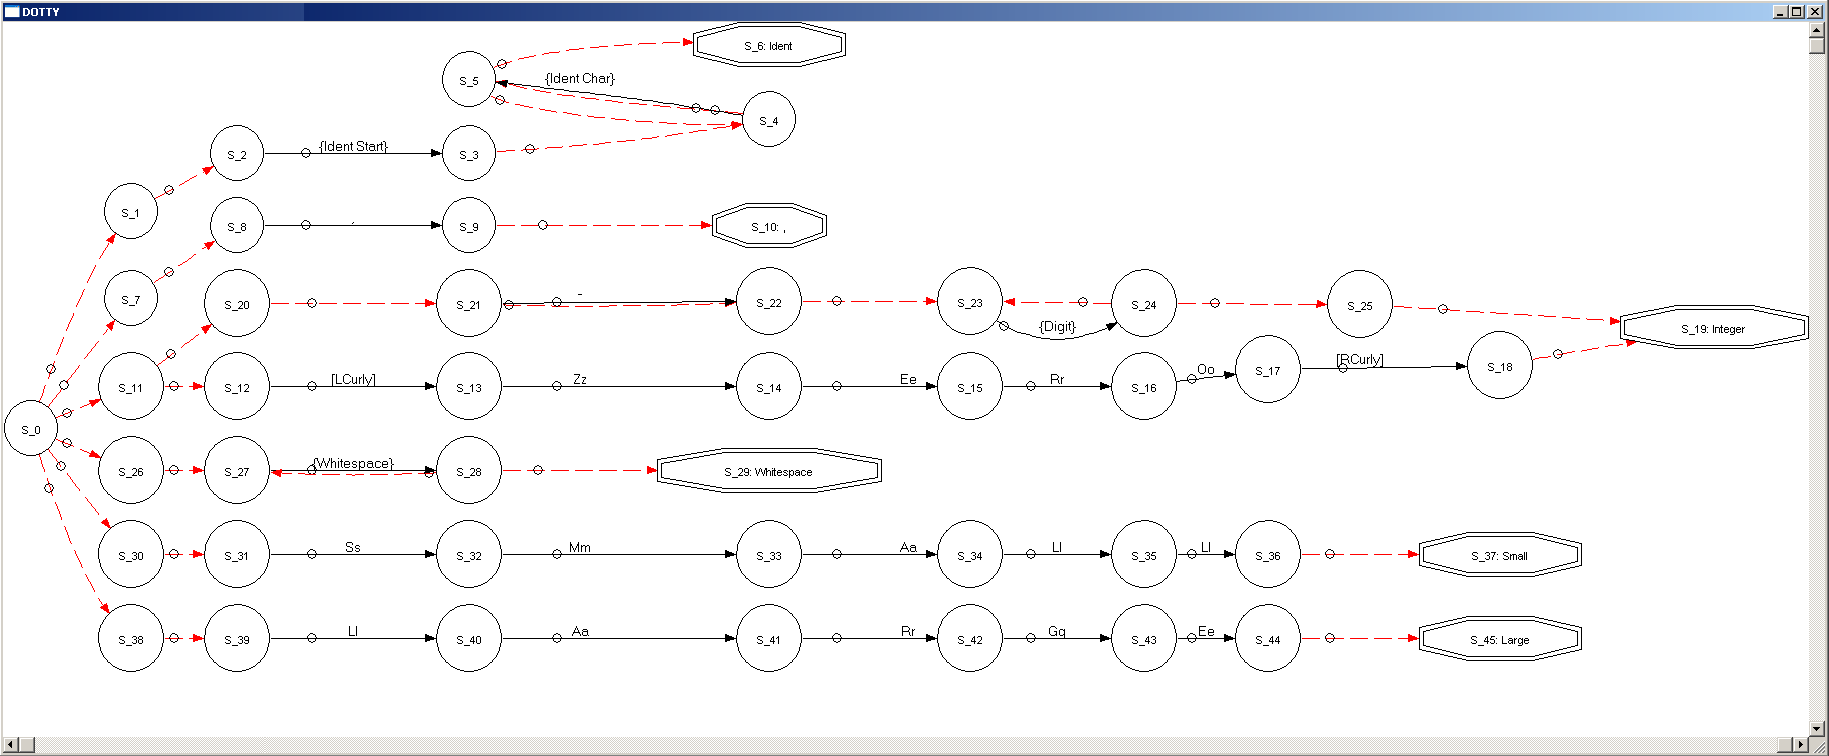
DFA:
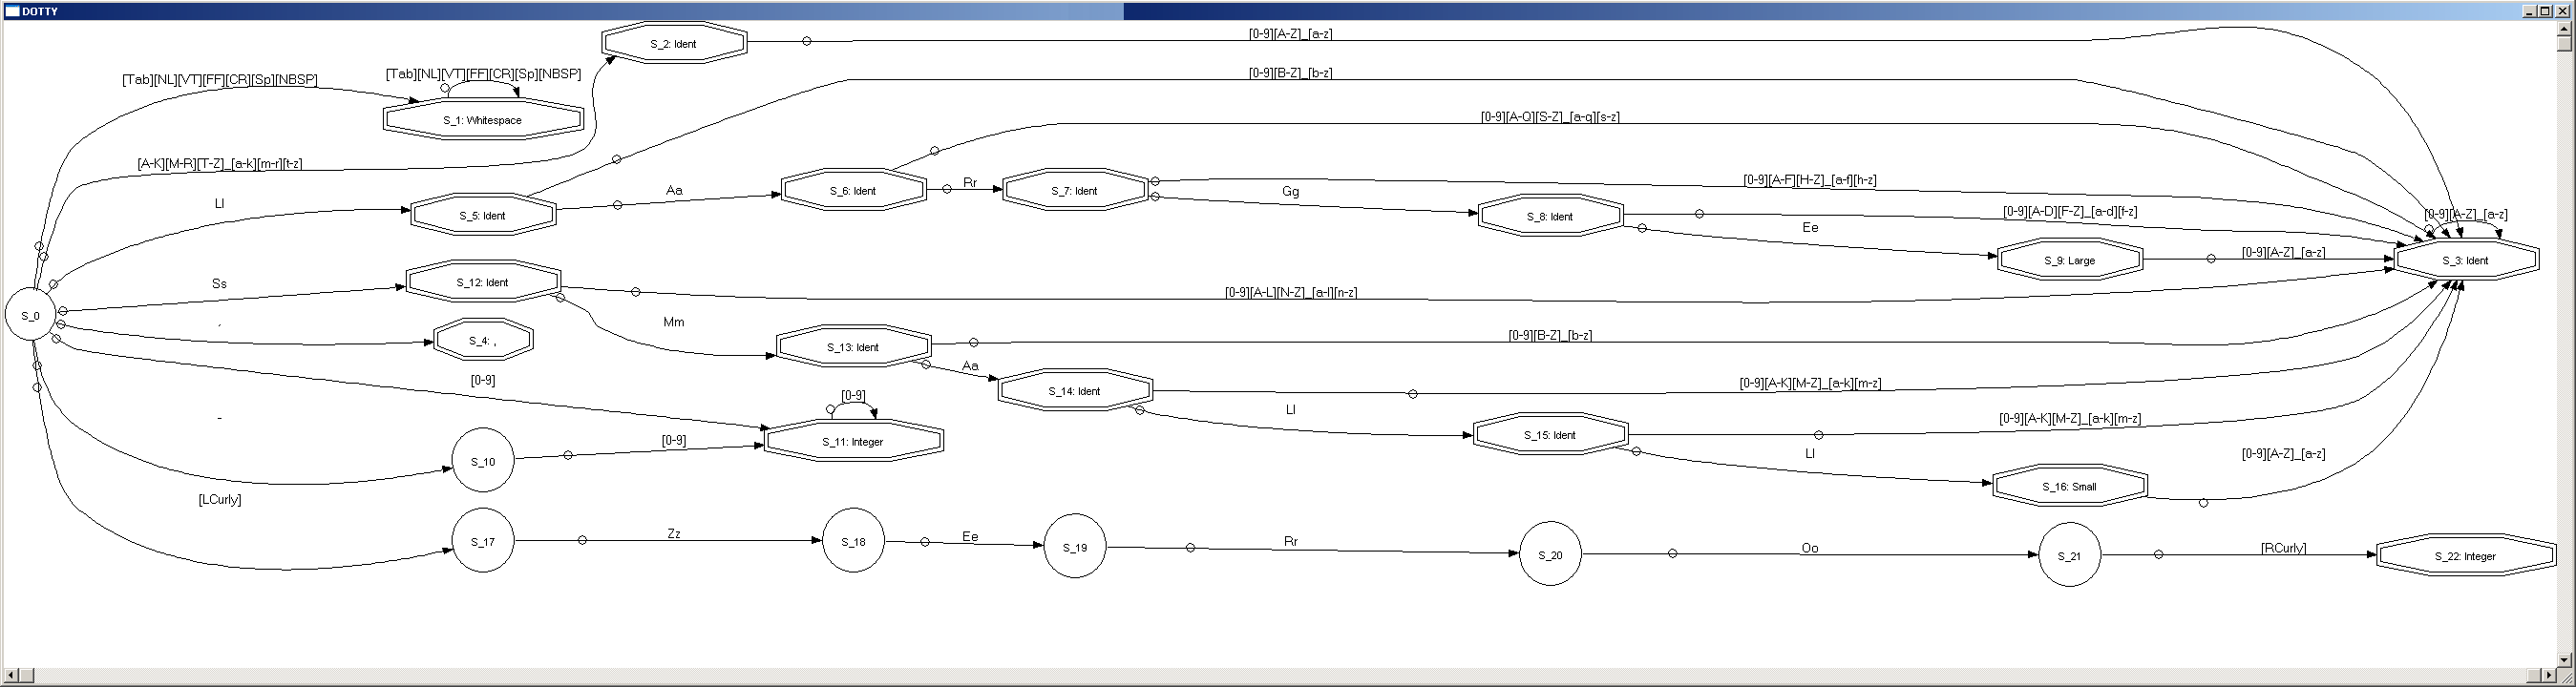
The graphs are a series of states with transitions between them. Each state is numbered, starting with "S_0" - the state where the lexer always begins. States that accept a terminal are double-octagons instead of circles. The solid black arrows between the states are transitions. They are labeled with the characters which, when read from the input, cause the state machine to take that transition. The NFA also has dotted red arrows which indicate transitions that don't require any input to be read (the existence of these empty transitions is what makes it an NFA). Every time the lexer accepts a terminal, it starts back at "S_0" again.
GOLD Parser Builder
GOLD Parser Builder is the program Goldie is based around. It can be used as an alternative to GRMC: Grammar Compiler or as an editor for grammar files. It also has extensive features for inspecting, analyzing and testing grammars.
Using GOLD Parser Builder is very straightforward. However, you can find a great overview of the UI on its screenshots page. There's also a commandline version.
Keep in mind, Goldie does not yet support GOLD's new v5 features, such as the .egt file format.